DevTech101

DevTech101
1 Star2 Stars3 Stars4 Stars5 Stars (No Ratings Yet)
Loading...

AWS Unlimited EC2 Elastic IPs - ("Poor man's solution")

As you might already know AWS limits the number of EIPs available to each customer’s account. You can request an increase, but even with the increase, you will quickly realized its likely not enough (depending how its used).

Below I am going to show one way to get around this limitation. As a side benefit, all EC2 instances are going to have their name automatically added/updated in DNS.

First, what is an EIP ? and when do need one ?

Below is how Amazon describes it.

An Elastic IP address is a static IPv4 address designed for dynamic cloud computing. An Elastic IP address is allocated to your AWS account, and is yours until you release it. By using an Elastic IP address, you can mask the failure of an instance or software by rapidly remapping the address to another instance in your account. Alternatively, you can specify the Elastic IP address in a DNS record for your domain, so that your domain points to your instance.

I will try to describe how the solution works, below.

For each EC2 instance, new or cloned.

  • Will updated DNS/Route53 CNAME with the EC2 Name – taken from the Name TAG
  • Will only run once at boot time (this can be changed if you like).
  • Requires a Name TAG on the EC2 instance
  • Will only take action if there is a change i.e. differs from current DNS.
  • Optionally: We can configure-so. that the process also updates a local git repository, and then runs the code for a full update (more on that below)

The script is mostly written in Python, with a small helper Shell script. The Python module is primarily using AWS Boto Python module.

First, we have to configure/add a Name TAG to my EC2 instance, otherwise the script will just ignore/skip and not do anything (for safety reasons).

Updating Name TAG on instance (option 1)

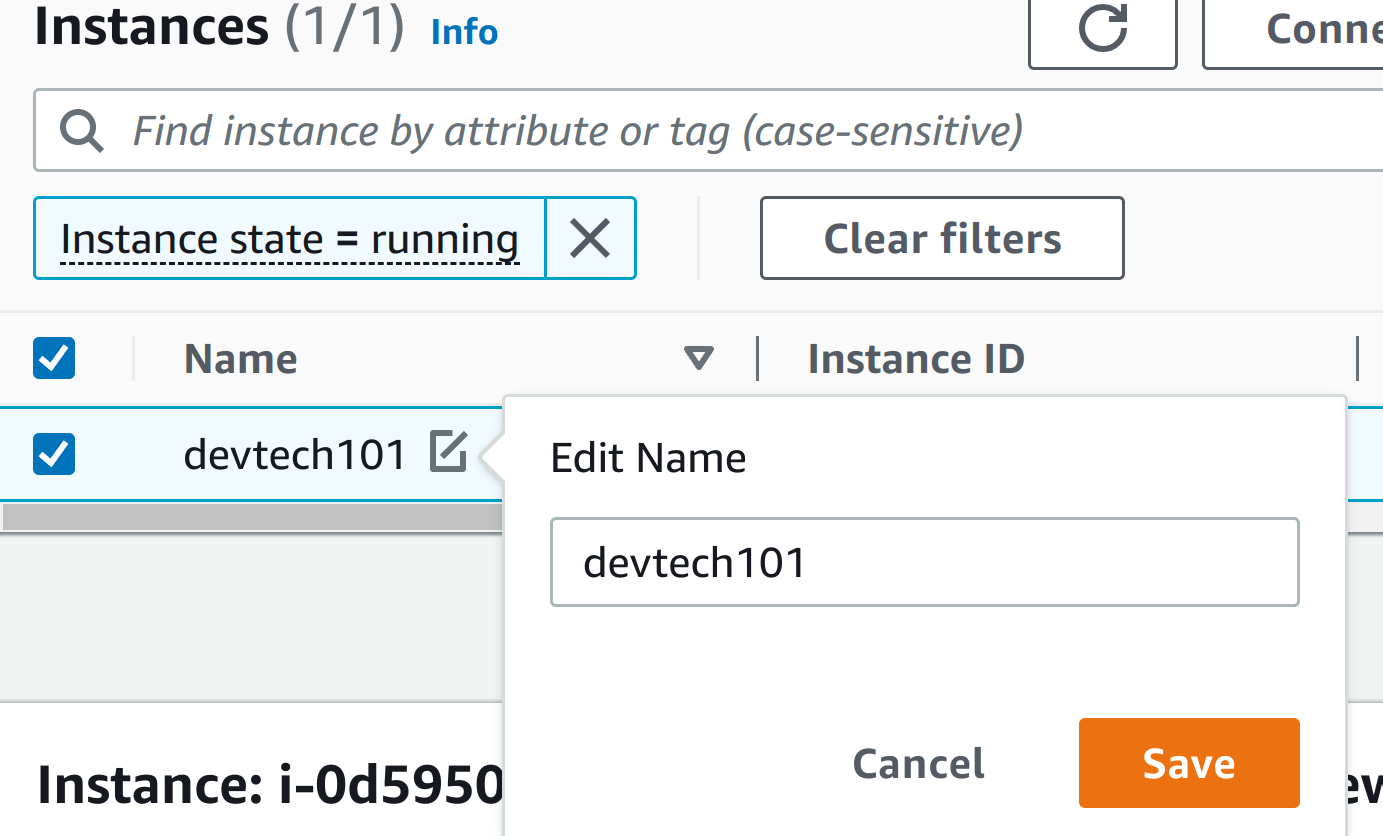
Updating Name TAG on instance (option 2)

Next, We are going to make sure that the EC2 instance has the correct IAM Role attached, to be able to add/update Route53 / DNS zone.

Below is an example of an IAM role one can use. Feel free to future restrict the IAM Role on a per instance OR DNS zone basis or so to your needs.

An Example IAM role is below.

{
    "Version": "2012-10-17",
    "Statement": [
        {
            "Sid" : "AllowPublicHostedZonePermissions",
            "Effect": "Allow",
            "Action": [
                "route53:CreateHostedZone",
                "route53:UpdateHostedZoneComment",
                "route53:GetHostedZone",
                "route53:ListHostedZones",
                "route53:DeleteHostedZone",
                "route53:ChangeResourceRecordSets",
                "route53:ListResourceRecordSets",
                "route53:GetHostedZoneCount",
                "route53:ListHostedZonesByName"
            ],
            "Resource": "*"
        },
        {
         "Sid" : "AllowHealthCheckPermissions",
            "Effect": "Allow",
            "Action": [
                "route53:CreateHealthCheck",
                "route53:UpdateHealthCheck",
                "route53:GetHealthCheck",
                "route53:ListHealthChecks",
                "route53:DeleteHealthCheck",
                "route53:GetCheckerIpRanges",
                "route53:GetHealthCheckCount",
                "route53:GetHealthCheckStatus",
                "route53:GetHealthCheckLastFailureReason"
            ],
            "Resource": "*"
        }
    ]
}

The policy above includes two statements:

  • The first statement grants permissions to the actions that are required to create and manage public hosted zones and their records. The wildcard character (*) in the Amazon Resource Name (ARN) grants access to all the hosted zones that are owned by the current AWS account.
  • The second statement grants permissions to all the actions that are required to create and manage health checks.

Do you need help with this configuration ? Just let us know.

Use the Contact Form to get in touch with us for a free Consultation.


We are now going to use a two part script to update DNS with the EC2 Tag Name.

Copy the below script and create a file to something like update_dns.py. additional are below.

Note: The below script assumes we are dealing with 2 types of systems. 1, a domain/dns-zone for dev, and 2, is a prod domain/dns-zone (feel free to modify to your own needs).

chmod 700 update-dns.py

Python /var/update-dns.py script.

#!/usr/bin/env python3

import os
import sys
import boto3
import requests

# AWS internal REST URL to get instance-id
instance_id_url = 'http://169.254.169.254/latest/meta-data/instance-id'

ec2 = boto3.client('ec2', region_name='us-east-1')
route53 = boto3.client('route53', region_name='us-east-1')

def get_my_hostname(instance_id, tag, region='us-east-1'):
    filters = [{'Name':'resource-id','Values':[instance_id]}]
    response = ec2.describe_tags(Filters=filters)
    try:
        filtered_tags = next(item['Value'] for item in response['Tags'] if item["Key"] == tag)
    except Exception as e:
        filtered_tags = ""
    return (filtered_tags)


def get_ec2_record(ec2_name):
    response = ec2.describe_instances(
        Filters=[
                {
                    'Name': 'tag:Name',
                    'Values': [ec2_name]
            }
        ]
    )
    return response


def update_dns_record_sets(Name, value, action, type, ttl, zoneid):
    print(Name, value, action, type, ttl, zoneid)
    try:
        response = route53.change_resource_record_sets(
        HostedZoneId=zoneid,
        ChangeBatch= {
                        'Comment': 'update %s -> %s' % (Name, value),
                        'Changes': [
                            {
                             'Action': action,
                             'ResourceRecordSet': {
                                 'Name': Name,
                                 'Type': type,
                                 'TTL': ttl,
                                 'ResourceRecords': [{'Value': value}]
                            }
                        }]
        })
    except Exception as e:
        print(e)


def get_dns_record(zoneid, tagged_hostname, public_ip_name):

    old_ip_address = None
    response = route53.list_resource_record_sets(
            HostedZoneId=zoneid,
            StartRecordName=tagged_hostname,
            StartRecordType='A',
            MaxItems='1'
    )

    if response['ResourceRecordSets'][0]['Type'] == 'A' and response['ResourceRecordSets'][0]['Name'] == tagged_hostname:
        old_ip_address = response['ResourceRecordSets'][0]['ResourceRecords'][0]['Value']

    return old_ip_address, response if response['ResourceRecordSets'][0]['Name'] == tagged_hostname \
                        and response['ResourceRecordSets'][0]['ResourceRecords'][0]['Value'] != public_ip_name \
                        or response['ResourceRecordSets'][0]['Name'] != tagged_hostname else ""


# Get my own hostname based on IP
instance_id = requests.get(instance_id_url, timeout=5).text

tagged_hostname = get_my_hostname(instance_id, 'Name')
current_hostname = os.uname().nodename
if tagged_hostname and current_hostname != tagged_hostname:
    set_hostname_results = os.system(f"hostnamectl set-hostname {tagged_hostname}")
    print(f"Setting new hostname as {tagged_hostname}, with exit code {set_hostname_results}")

# Update DNS with hostname's public ip
ec2_record = get_ec2_record(tagged_hostname)

if tagged_hostname:
    try:
        public_ip = 'ec2-' + ec2_record['Reservations'][0]['Instances'][0]['PublicIpAddress'].replace('.', '-') + '.compute-1.amazonaws.com'
        zone_name = "devtech101.com" if get_my_hostname(instance_id, 'Env').startswith("prod") else "devtech101-dev.com"
        zoneid = "Z0123456789ABCD1EF1" if zone_name == 'devtech101-dev.com' else "Z0123456789ABCD1EF2" if zone_name == 'devtech101.com' else "Z0123456789ABCD1EF1"        
        os.system(f'netplan_update.sh {zone_name}')

        # Updating new dns record
        (old_public_ip, response) = get_dns_record(zoneid, tagged_hostname + '.' + zone_name + '.', public_ip)
        if response:
            print(f"Updating host: {tagged_hostname}.{zone_name} with ip address: {public_ip}")
            if old_public_ip:
                update_dns_record_sets(tagged_hostname + '.' + zone_name, old_public_ip, 'DELETE', 'A', 60, zoneid)
            update_dns_record_sets(tagged_hostname + '.' + zone_name, public_ip, 'UPSERT', 'CNAME', 60, zoneid)
        else:
            print(f"No updated necessary for host: {tagged_hostname}.{zone_name} with ip address: {public_ip}")
    except Exception as e:
        print(e)
        print("EC2 instance name not found!")
Breaking down the parts of the script.
 
To take any action we need to get the EC2 system Name we are dealing with (i.e. our own System Name – value of the Name TAG).

Now, with AWS – the only uniq value on an EC2 instance is the instance_id. so we first need to get our instance_id. for that AWS provides the REST lookup to the 169.254.169.254 address.

Next, once we have the instance_id we will be using that to retrieve the instance  Name TAG.
Next, Optional: will change/update the local Linux host-name to match the Name TAG (this can be commented if not necessary).
Next, will retrieve the instance public IP or the AWS EC2 computer Name
Next,  select DNS zone to use dev or prod based on Name TAG
Next, Optionally, run the netplan script to update dnsmasq and Ubuntu netplan (feel free to commented if not necessary).
Last, add/updated/(delete old) Route53 with the Name TAG pointing to the EC2 CNAME.
 
We also need the helper script – below (feel free to omit if unnecessary).
Create a /var/netplan_update.sh script like the one below (update the script as needed).
#!/bin/bash
exec >> /tmp/dns_update.out 2>&1
echo -e 'Updating netplan config\n=================================='
date
domain_name=${1-devtech101-dev.com}
echo "Setting domain to: $domain_name"
# Do not use DNS servers received from the DHCP - (use dnsmasq, which listines on localhost)
sudo /usr/sbin/netplan set network.ethernets.ens5.dhcp4-overrides.use-dns=false
# Setting nameserver search-domain to your domain - this will help in resolving your host-name.
sudo /usr/sbin/netplan set network.ethernets.ens5.nameservers.search=[$domain_name]
# Setting nameserver to the loopback address - (dnsmasq)
sudo /usr/sbin/netplan set network.ethernets.ens5.nameservers.addresses=[127.0.0.1]
# Apply the netplan to the system files 
sudo /usr/sbin/netplan --debug apply
sleep 2
# Restart dns system related services
sudo /usr/bin/systemctl restart dnsmasq.service systemd-resolved.service
echo -e 'Netplan config updated successful\n=================================='

We are almost done.

All we need now is, adding the Python script to cron.

We will be using the cron @reboot TAG, so the script only runs once the system boots.

root crontab example is below – sudo crontab -l

@reboot /var/update-dns.py >> /tmp/dns_update.out 2>&1

Do you need help with this configuration ? Just let us know.

Like this article. Please provide feedback, or let us know in the comments below.

Use the Contact Form to get in touch with us for a free Consultation.

0 0 votes
Article Rating
Subscribe
Notify of
guest
0 Comments
Inline Feedbacks
View all comments
0
Would love your thoughts, please comment.x
()
x
%d bloggers like this: