 (No Ratings Yet)
Configuring Consul for Service Discovery in a Multiple Data Centers
This is part two on Configuring Consul for Service Discovery in a Multiple Data Centers using version 1.4, to see part 1 click here.
Note: You might also want to read the original post which was using version 0.9.2, by going here part 1 and here part 2.
In the first part I successfully showed how to create a two separate data center stand alone Consul environment.
For a quick recap from part 1 I included below the Consul Multi Data Center Layout.
Consul Multi Data Center layout used in this article
Below, we are first gong to verify the Consul environment is working properly, we will then move-on to configure Consul GEO prepared query for multi Data Center use, then, we will finally complete the Consul setup with a few API examples, using Curl or Python.
To test/verify your cluster, just run the below DNS checks.
Tip: Consul should return 3 address (if using a 3 master node cluster).
dig @10.150.100.17 -p 8600 consul.service.consul

; <<>> DiG 9.6-ESV-R11-P6 <<>> @10.150.100.17 -p 8600 consul.service.consul
; (1 server found)
;; global options: +cmd
;; Got answer:
;; ->>HEADER<<- opcode: QUERY, status: NOERROR, id: 20238
;; flags: qr aa rd ra; QUERY: 1, ANSWER: 3, AUTHORITY: 0, ADDITIONAL: 3

;; QUESTION SECTION:
;consul.service.consul.         IN      A

;; ANSWER SECTION:
consul.service.consul.  0       IN      A       10.150.100.17
consul.service.consul.  0       IN      A       10.150.100.18
consul.service.consul.  0       IN      A       10.150.100.19

;; ADDITIONAL SECTION:
consul.service.consul.  0       IN      TXT     "consul-network-segment="
consul.service.consul.  0       IN      TXT     "consul-network-segment="
consul.service.consul.  0       IN      TXT     "consul-network-segment="

;; Query time: 1 msec
;; SERVER: 10.150.100.17#8600(10.150.100.17)
;; WHEN: Wed Jan 30 09:31:05 EST 2019
;; MSG SIZE  rcvd: 143
To return Data Center specific information.
For DC1 just run the below.
dig @10.150.100.17 -p 8600 consul.service.dc1.consul

; <<>> DiG 9.6-ESV-R11-P6 <<>> @10.150.100.17 -p 8600 consul.service.dc1.consul
; (1 server found)
;; global options: +cmd
;; Got answer:
;; ->>HEADER<<- opcode: QUERY, status: NOERROR, id: 29426
;; flags: qr aa rd ra; QUERY: 1, ANSWER: 3, AUTHORITY: 0, ADDITIONAL: 3

;; QUESTION SECTION:
;consul.service.dc1.consul.     IN      A

;; ANSWER SECTION:
consul.service.dc1.consul. 0    IN      A       10.150.100.18
consul.service.dc1.consul. 0    IN      A       10.150.100.17
consul.service.dc1.consul. 0    IN      A       10.150.100.19

;; ADDITIONAL SECTION:
consul.service.dc1.consul. 0    IN      TXT     "consul-network-segment="
consul.service.dc1.consul. 0    IN      TXT     "consul-network-segment="
consul.service.dc1.consul. 0    IN      TXT     "consul-network-segment="

;; Query time: 1 msec
;; SERVER: 10.150.100.17#8600(10.150.100.17)
;; WHEN: Wed Jan 30 09:33:21 EST 2019
;; MSG SIZE  rcvd: 147
For DC2 just run the below.
dig @10.50.100.17 -p 8600 consul.service.dc2.consul

; <<>> DiG 9.6-ESV-R11-P6 <<>> @10.50.100.17 -p 8600 consul.service.dc2.consul
; (1 server found)
;; global options: +cmd
;; Got answer:
;; ->>HEADER<<- opcode: QUERY, status: NOERROR, id: 18210
;; flags: qr aa rd ra; QUERY: 1, ANSWER: 3, AUTHORITY: 0, ADDITIONAL: 3

;; QUESTION SECTION:
;consul.service.dc2.consul.     IN      A

;; ANSWER SECTION:
consul.service.dc2.consul. 0    IN      A       10.50.100.18
consul.service.dc2.consul. 0    IN      A       10.50.100.17
consul.service.dc2.consul. 0    IN      A       10.50.100.19

;; ADDITIONAL SECTION:
consul.service.dc2.consul. 0    IN      TXT     "consul-network-segment="
consul.service.dc2.consul. 0    IN      TXT     "consul-network-segment="
consul.service.dc2.consul. 0    IN      TXT     "consul-network-segment="

;; Query time: 3 msec
;; SERVER: 10.50.100.17#8600(10.50.100.17)
;; WHEN: Wed Jan 30 09:32:29 EST 2019
;; MSG SIZE  rcvd: 199
To lookup a specific service.
Tip: If omitting the DC keyword, it will always return the local client DC.
dig @10.150.100.17 -p 8600 rad-6789.service.consul

; <<>> DiG 9.6-ESV-R11-P6 <<>> @10.150.100.17 -p 8600 rad-6789.service.consul
; (1 server found)
;; global options: +cmd
;; Got answer:
;; ->>HEADER<<- opcode: QUERY, status: NOERROR, id: 2241
;; flags: qr aa rd ra; QUERY: 1, ANSWER: 1, AUTHORITY: 0, ADDITIONAL: 1

;; QUESTION SECTION:
;rad-6789.service.consul.       IN      A

;; ANSWER SECTION:
rad-6789.service.consul. 0      IN      A       10.150.0.106

;; ADDITIONAL SECTION:
rad-6789.service.consul. 0      IN      TXT     "consul-network-segment="

;; Query time: 1 msec
;; SERVER: 10.150.100.17#8600(10.150.100.17)
;; WHEN: Wed Jan 30 09:34:58 EST 2019
;; MSG SIZE  rcvd: 93
So far we have been configuring two stand alone working Consul clusters (with shared serf results). however it will only return local results, meaning if your client has joint dc1, you will get back dc1 results.
In order to return DC specific results, we will have to configure Consul GEO auto fail-over.
In the next section I will show you how to configure Consul GEO failover.
Consul Multi Data Center Configuration
To use Consul GEO failover, you will have to create something referred to as a prepared query.
The Consul prepared query gives you the capability to use an API or DNS lookup, based on the query keyword. prepared query’s also gives you the capability to cascade data centers, more is explained below.
There are many options available to use in a prepared query, you can basically use any reg-ex style to manipulate the dns/api data returned.
In our example below, we create a prepared query matching lookups with the Service name, in our example service, rad-6789 will be looked-up and matched. first matching dc1, then if failed return dc2. an example lookup is below.
Creating a prepared query
To create the prepared query run the below.
curl --request POST --data \
'{
  "Name": "",
  "Template": {
    "Type": "name_prefix_match"
  },
  "Service": {
    "Service": "${name.full}",
    "Failover": {
      "NearestN": 2
    }
  }
}' http://10.150.100.17:8500/v1/query
Tip: The name.full matches any service name.
To verify the prepared query was added to the system and is working, just run the below, the results should look similar to the output below.
curl -q http://10.150.100.17:8500/v1/query |python -m json.tool
  % Total    % Received % Xferd  Average Speed   Time    Time     Time  Current
                                 Dload  Upload   Total   Spent    Left  Speed
100   397  100   397    0     0  30046      0 --:--:-- --:--:-- --:--:--  387k
[
    {
        "CreateIndex": 190,
        "DNS": {
            "TTL": ""
        },
        "ID": "6bcbb58f-a22b-b676-7d7f-f36c372a6493",
        "ModifyIndex": 190,
        "Name": "",
        "Service": {
            "Connect": false,
            "Failover": {
                "Datacenters": [
                    "dc1",
                    "dc2"
                ],
                "NearestN": 2
            },
            "IgnoreCheckIDs": null,
            "Near": "",
            "NodeMeta": null,
            "OnlyPassing": false,
            "Service": "${name.full}",
            "Tags": null
        },
        "Session": "",
        "Template": {
            "Regexp": "",
            "RemoveEmptyTags": false,
            "Type": "name_prefix_match"
        },
        "Token": ""
    }
]
Other prepared query options are to set the Datacenters lookup order, or max Data Center hops, an example is below.
curl --request POST --data \
'{
  "Name": "",
  "Template": {
    "Type": "name_prefix_match"
  },
  "Service": {
    "Service": "${name.full}",
    "Failover": {
      "NearestN": 3
      "Datacenters": ["dc1", "dc2"]
    }
  }
}' http://10.150.100.17:8500/v1/query
For a full list of options please check the Consul API query docs.
Finally, we are now ready for the fun part. to test the HA service across Data Centers, follow the below to see that in action.
The assumption is that both DC’s you configured run a service. in our example I am using the Solaris RAD service which listens on port 6789, in the original post available here I used a MySQL DB listening on port 3306, feel free to replace with your choice of db/application.
Note: The above configuration uses the Consul TCP port check, there are a number of other options, including using your own script.
Below is an example service lookup using the query keyword, instead of the service keyword, which works across data centers, the first lookup reaches/returns DC1, and the second lookup reaches/returns DC2, since DC1 is down.
dig @10.150.100.17 -p 8600 rad-6789.query.consul srv

; <<>> DiG 9.6-ESV-R11-P6 <<>> @10.150.100.17 -p 8600 rad-6789.query.consul srv
; (1 server found)
;; global options: +cmd
;; Got answer:
;; ->>HEADER<<- opcode: QUERY, status: NOERROR, id: 16136
;; flags: qr aa rd ra; QUERY: 1, ANSWER: 1, AUTHORITY: 0, ADDITIONAL: 3

;; QUESTION SECTION:
;rad-6789.query.consul.         IN      SRV

;; ANSWER SECTION:
rad-6789.query.consul.  0       IN      SRV     1 1 22 0a96006a.addr.dc1.consul.

;; ADDITIONAL SECTION:
0a96006a.addr.dc1.consul. 0     IN      A       10.150.0.106
Dc1Client1.node.dc1.consul. 0   IN      TXT     "consul-network-segment="

;; Query time: 1 msec
;; SERVER: 10.150.100.17#8600(10.150.100.17)
;; WHEN: Wed Jan 30 09:51:43 EST 2019
;; MSG SIZE  rcvd: 151
As you can see it returns the local IP Address
Tip: If you like the return to be a different IP Address, you can replace that by adding the Address keyword.
Now, stop the local service or Consul agent, run the exact same lookup again, and here you go, it should/will return the remote rad-6789 address, like the example below.
dig @10.150.100.17 -p 8600 rad-6789.query.consul srv

; <<>> DiG 9.6-ESV-R11-P6 <<>> @10.150.100.17 -p 8600 rad-6789.query.consul srv
; (1 server found)
;; global options: +cmd
;; Got answer:
;; ->>HEADER<<- opcode: QUERY, status: NOERROR, id: 31221
;; flags: qr aa rd ra; QUERY: 1, ANSWER: 1, AUTHORITY: 0, ADDITIONAL: 2

;; QUESTION SECTION:
;rad-6789.query.consul.         IN      SRV

;; ANSWER SECTION:
rad-6789.query.consul.  0       IN      SRV     1 1 22 0a32006a.addr.dc2.consul.

;; ADDITIONAL SECTION:
0a32006a.addr.dc2.consul. 0     IN      A       10.50.0.106
Dc2Client1.node.dc2.consul. 0   IN      TXT     "consul-network-segment="

;; Query time: 4 msec
;; SERVER: 10.150.100.17#8600(10.150.100.17)
;; WHEN: Wed Jan 30 09:53:29 EST 2019
;; MSG SIZE  rcvd: 151
Note: You can also run the query with out the SRV keyword to return just the IP Address.
Working RAD service (TCP check).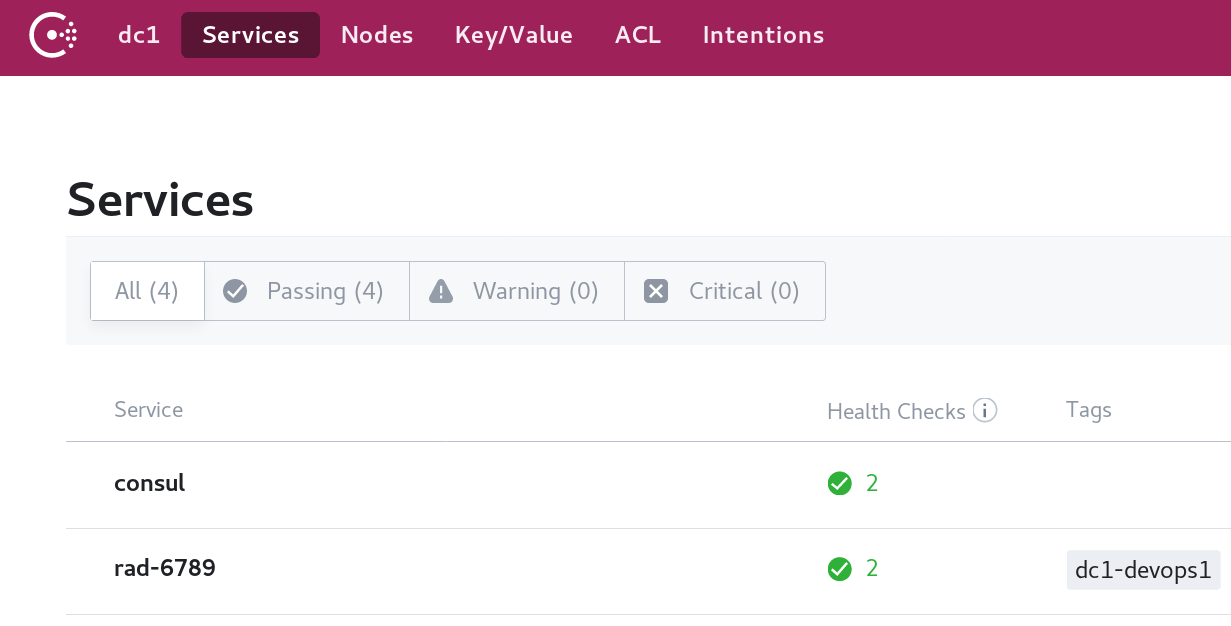

DC2 node status.
Failed RAD service (TCP check).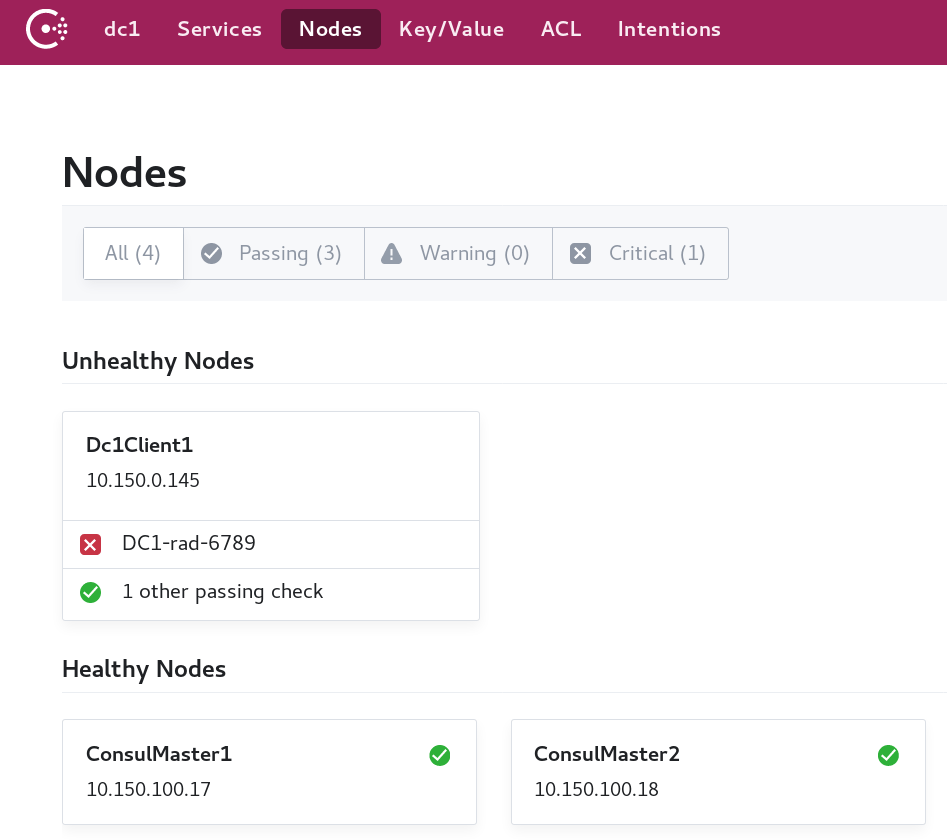

Using Python to access Consul Data
Till now we ware only using regular DNS tools like dig or nslookup. in the next section I will show you how to use Python to return the same results.
To simple return DNS results, we can use one of the Python DNS modules. a simple example is below.
#!/bin/python

from dns import resolver

consul_resolver = resolver.Resolver()
consul_resolver.port = 8600
consul_resolver.nameservers = ["10.150.100.17"]

# srv record
answer = consul_resolver.query("db1.query.consul", 'SRV')
print answer.response.additional[0].items[0].address, answer[0].port

#just ip
answer = consul_resolver.query("db1.query.consul", 'A')
for answer_ip in answer:
    print(answer_ip)
Running the above Python script will return two lines, one line will show just the IP address, and one line will show the IP Address and the port.
In our case it should look like the below.
10.150.0.106 22
10.150.0.106
All of the examples above was using regular built-in Python modules, next I will show you how you can use the more specific Python Consul Module.
To use Python Consul Module, we must first install the Python Module, you do so by running the below.
pip install python-consul
There are so many ways to manipulate Consul data with the Python module, it will be hard to cover all of them, I will include just a few examples below.
Returning Consul node results.
#!/bin/python

import consul, os, sys, json, re, pprint

# Uncomment if you have proxy issues
#del os.environ['http_proxy']
#del os.environ['HTTP_PROXY']
#del os.environ['https_proxy']
#del os.environ['HTTPS_PROXY']

def main():
    c = consul.Consul(host='10.150.100.17')

    _, nodes = c.catalog.nodes()
    for i in range(0, len(nodes)):
        # Print full node array
        print nodes[i]
        # Print Node Name and IP
        print nodes[i]['Node'], nodes[i]['Address']

if __name__ == "__main__":
    main()
Disabling a Consul service.
#!/bin/python

import consul, os, sys, json, re, pprint
def main():
    c = consul.Consul(host='10.150.100.17')

    # Put a node in maintenance mode.
    c.agent.maintenance('true', 'this is a test')
    # Remove the node from maintenance mode
    c.agent.maintenance('false')

if __name__ == "__main__":
    main()
Below is a partial list of options, just uncomment what you are trying to use.
#!/bin/python

import consul, os, sys, json, re, pprint

del os.environ['http_proxy']
del os.environ['HTTP_PROXY']
del os.environ['https_proxy']
del os.environ['HTTPS_PROXY']

def main():
    c = consul.Consul(host='10.150.100.17')
    #c = consul.Consul()

    # Register Service
    #c.agent.service.register('my_service',
                             #service_id='my_service_1',
                             #port=3306,
                             #tags=['mytag1', 'mytag2'])

    #print(c.agent.services())

    # From agent view list all registered Services, checks, members
    #for x in c.agent.services():
        #print(x)
    #for x in c.agent.checks():
        #print(x)
    #for x in c.agent.members():
        #print(x)

    # Node in maintance
    #c.agent.maintenance('true', 'this is a test')
    #c.agent.maintenance('false')

    # Service in maintance
    #c.agent.service.maintenance('http', 'false', 'this is a test')
    #c.agent.service.maintenance('http', 'false')

    # Return all dc's
    #for x in c.catalog.datacenters():
        #print (x)

    # Returns nodes
    _, nodes = c.catalog.nodes()
    #print nodes
    for i in range(0, len(nodes)):
        print nodes[i]
        print nodes[i]['Node'], nodes[i]['Address']
        #print nodes[i]['Node']['Datacenter']

    #for x in c.catalog.nodes():
        #pprint.pprint(x)
        #print(Node.x)

    #for x in c.health.checks():
        #print (x)

    #for x in c.agent.self():
        #print(x)

    # To remove the service entry
    #c.agent.service.deregister(service_id='my_service_1')

if __name__ == "__main__":
    main()
For the full list of the python module options please click here.
I hope you enjoyed reading the Consul Multi Data Center setup and configuration, give it a thumbs up by rating the article or by just providing feedback.
You might also like – realted to Docker Kubernetes / micro-services.